PowerShellでS3のサーバーアクセスログをTSV形式に変換しEXCELで分析

S3はのサーバのアクセスログを取得することが可能です。

f:id:yomon8:20191125231721p:plain

通情、このログを分析するなら、Athenaが便利です。公式にもわかりやすい手順が出ています。

Athena を使用したアクセスログの分析

ただ、色々な制約でAthenaが使えない、Pandasも使えない、ましてやDrillも使えない。Windows PC標準構成で分析しなければいけない場合があれば、この記事が役立つかもしれません。

※早い処理では無いのと、ViewerがEXCELなので本当に大量のアクセスログの分析には向いてません

Windows標準のPowerShellでサーバーアクセスログをTSV化して、EXCELで読み込ませるまでを書きます。

指定日時のアクセスログをダウンロード

アクセスログは日時をプレフィックスにした名前で出力されます。

f:id:yomon8:20191126082202p:plain

aws s3 sync の場合は以下のように、--exclude *--include オプションを使えば、指定日時のデータをダウンロードできます。

以下は2019年11月10日を取りたいので、 --include "2019-11-10-10-*" とオプションを設定しています。

$ aws s3 sync s3://your-bucket/path/to/your/server_access_logs/ . --exclude "*" --include "2019-11-10-10-*"

PowerShell でTSV化

EXCELで読むためにTSV化します。冒頭で紹介したのAthenaの記事を参考に構造を作成して、正規表現でパースします。

$outFile = "./out.csv"
$concatenatedFile = "./concatenated.log"
$pattern = '([^ ]*) ([^ ]*) \[(.*?)\] ([^ ]*) ([^ ]*) ([^ ]*) ([^ ]*) ([^ ]*) \"([^ ]*) ?([^ ]*) ?(- |[^ ]*)\" (-|[0-9]*) ([^ ]*) ([^ ]*) ([^ ]*) ([^ ]*) ([^ ]*) ([^ ]*) (\"[^\"]*\") ([^ ]*)(?: ([^ ]*) ([^ ]*) ([^ ]*) ([^ ]*) ([^ ]*) ([^ ]*))?.*$'

# ファイルを集約(大量のファイルを個別に処理すると遅いので)
Get-Content .\* | Set-Content $concatenatedFile 

# Header書き出し
"BucketOwner`tBuck$paet`tRequestDateTime`tRemoteIP`tRequester`tRequestID`tOperation`tKey`tRequestURI_operation`tRequestURI_key`tRequestURI_httpProtoversion`tHTTPstatus`tErrorCode`tBytesSent`tObjectSize`tTotalTime`tTurnAroundTime`tReferrer`tUserAgent`tVersionId`tHostId`tSigV`tCipherSuite`tAuthType`tEndPoint`tTLSVersion" > $outFile

# Data書き出し
Get-Content $concatenatedFile  | Select-String -Pattern $pattern | ForEach-Object { $_.Matches[0].Groups[1..26] -join "`t" } >> $outFile

EXCELで開く

上記の場合だと out.csv というファイルが出力されています。これがTSVなのでそのままEXCELで開いて作業できます。

f:id:yomon8:20191125232404p:plain

PowerShellのワンライナーを実行するWindowsタスクをPowerShellで登録

題名の通り、WindowsタスクにPowerShellのワンライナーを埋め込みたくて方法を調べていました。ついでに、IISのログを削除するWindowsタスクを、PowerShellワンライナーで実装して、PowerShellでWindowsタスク登録するまでやったのでメモ。(何書いてるかわからなくなってきましたが)

実際の実装例として、指定の日数より古いIISのログを削除するWindowsタスクを登録するPowerShellを書いてみました。

Windowsはタスク一つ登録するのにも大変ですね・・その分色々できますが。PowerShell使えば手順的にもシンプルになって良いです。

$iisLogDir = "C:\inetpub\logs\LogFiles\W3SVC1"
$logRetentionDays = 30
$filter = "*.log"

$taskName = "HouseKeep IIS Logs"
$taskPath = "\IIS Tasks"

$powershellExe = "C:\Windows\System32\WindowsPowerShell\v1.0\powershell.exe"
$command = '-Command "Invoke-Command {'
$command += "Get-ChildItem -Path '$iisLogDir' -Filter '$filter'" 
$command += " | ?{!`$_.PSIsContainer}" 
$command += " | ?{((Get-Date) - `$_.CreationTime).Days -gt $logRetentionDays}"
$command += " | %{Remove-Item `$_.FullName}"
$command += '}"'

$principal =  New-ScheduledTaskPrincipal -UserID "NT AUTHORITY\SYSTEM" -LogonType ServiceAccount 
$action = New-ScheduledTaskAction -Execute $powershellExe -Argument $command
$trigger = New-ScheduledTaskTrigger -Daily -At 1am
$task = New-ScheduledTask -Trigger $trigger -Principal $principal -Action $action 

Register-ScheduledTask -InputObject $task -TaskName $taskName -TaskPath $taskPath 

後は実行テストしてみます。たぶん問題無く動くはず。

f:id:yomon8:20190919204130p:plain

GitHubから特定のディレクトリ配下のファイルをPowerShellワンライナーで一括ダウンロード

ちょっと作ったのでメモ。

取得したいもの

今回、ここにあるRedshiftのView定義用のSQLファイルを取得したいと思います。

https://github.com/awslabs/amazon-redshift-utils/tree/master/src/AdminViews

利用するGithub API

以下のContents APIを利用します。

developer.github.com

以下のルールでAPIのURL組み立てます。

GET https://api.github.com/repos/:owner/:repo/contents/:path

上記のリポジトリの場合は以下のURLになります。

https://api.github.com/repos/awslabs/amazon-redshift-utils/contents/src/AdminViews

ワンラインナー

ワンライナーと言っておきながらですが、APIのURL入れると長くなって読み難いので、変数入れます。

PS:> $url = "https://api.github.com/repos/awslabs/amazon-redshift-utils/contents/src/AdminViews"

後は以下を実行するだけです。

PS:> (Invoke-WebRequest -Uri $url).Content | ConvertFrom-Json | foreach{$_.download_url} | foreach{Invoke-WebRequest -Uri $_ -OutFile ([System.Web.HttpUtility]::UrlDecode(([System.Uri]$_).segments[-1],[Text.Encoding]::GetEncoding("utf-8")))}

取得できています。

PS: > ls

Mode                LastWriteTime         Length Name
----                -------------         ------ ----
-a----       2019/07/18     13:42           3759 README.md
-a----       2019/07/18     13:42           1510 v_check_data_distribution.sql
-a----       2019/07/18     13:42            765 v_check_transaction_locks.sql
-a----       2019/07/18     13:42           1124 v_check_wlm_query_time.sql
--省略--
-a----       2019/07/18     13:42           2982 v_space_used_per_tbl.sql
-a----       2019/07/18     13:42           2610 v_vacuum_summary.sql
-a----       2019/07/18     13:42           1308 v_view_dependency.sql

Windowsのinode的情報BY_HANDLE_FILE_INFORMATIONを取得するPowerShellスクリプト

Windowsでもinode的なところを調べたかったのですが調べてみると、

stackoverflow.com

Open both files with CreateFile, call GetFileInformationByHandle for both, and compare dwVolumeSerialNumber, nFileIndexLow, nFileIndexHigh. If all three are equal they both point to the same file:

とのことで、GetFileInformationByHandle 関数で取得できる、BY_HANDLE_FILE_INFORMATION のStructureを調べれば良いようです。

GetFileInformationByHandle function | Microsoft Docs _BY_HANDLE_FILE_INFORMATION | Microsoft Docs

ここで取得した dwVolumeSerialNumber, nFileIndexLow, nFileIndexHigh を比較するということのようです。

処理の定義

すみません。PowerShellと題名に書いておきながらコードはC#です。

yomon.hatenablog.com

以下をPowerShellに貼り付けてEnterで定義ができます。

Add-Type -TypeDefinition @'
using System;
using System.Collections.Generic;
using System.IO;
using System.Runtime.InteropServices;
using System.Text;
using Microsoft.Win32.SafeHandles;
using FILETIME = System.Runtime.InteropServices.ComTypes.FILETIME;

namespace WindowsFileInfo
{
    public static class Kernel32Api
    {
        [StructLayout(LayoutKind.Sequential)]
        public struct BY_HANDLE_FILE_INFORMATION
        {
            public uint FileAttributes;
            public FILETIME CreationTime;
            public FILETIME LastAccessTime;
            public FILETIME LastWriteTime;
            public uint VolumeSerialNumber;
            public uint FileSizeHigh;
            public uint FileSizeLow;
            public uint NumberOfLinks;
            public uint FileIndexHigh;
            public uint FileIndexLow;
        }

        [DllImport("kernel32.dll", SetLastError = true, CharSet = CharSet.Auto)]
        static extern SafeFileHandle CreateFile(
            string lpFileName,
            [MarshalAs(UnmanagedType.U4)] FileAccess dwDesiredAccess,
            [MarshalAs(UnmanagedType.U4)] FileShare dwShareMode,
            IntPtr lpSecurityAttributes,
            [MarshalAs(UnmanagedType.U4)] FileMode dwCreationDisposition,
            [MarshalAs(UnmanagedType.U4)] FileAttributes dwFlagsAndAttributes,
            IntPtr hTemplateFile);

        [DllImport("kernel32.dll", SetLastError = true)]
        static extern bool GetFileInformationByHandle(SafeFileHandle handle, out BY_HANDLE_FILE_INFORMATION lpFileInformation);

        [DllImport("kernel32.dll", SetLastError = true)]
        [return: MarshalAs(UnmanagedType.Bool)]
        static extern bool CloseHandle(SafeHandle hObject);

        public static BY_HANDLE_FILE_INFORMATION GetFileInfo(string filepath)
        {
            SafeFileHandle handle = CreateFile(filepath, FileAccess.Read, FileShare.Read, IntPtr.Zero, FileMode.Open, FileAttributes.Archive, IntPtr.Zero);
            BY_HANDLE_FILE_INFORMATION fileInfo = new BY_HANDLE_FILE_INFORMATION();
            GetFileInformationByHandle(handle, out fileInfo);
            CloseHandle(handle);
            return fileInfo;
        }
    }
}
'@

確認

VolumeSerialNumberFileIndexHighFileIndexLow を比較して同一のファイルであることを判断します。

PS > echo "a" > a.txt
PS > $filepath = [System.IO.Directory]::GetCurrentDirectory() + "\a.txt"
PS >  [WindowsFileInfo.Kernel32Api]::GetFileInfo($filepath)
FileAttributes     : 32
CreationTime       : System.Runtime.InteropServices.ComTypes.FILETIME
LastAccessTime     : System.Runtime.InteropServices.ComTypes.FILETIME
LastWriteTime      : System.Runtime.InteropServices.ComTypes.FILETIME
VolumeSerialNumber : 2421491731
FileSizeHigh       : 0
FileSizeLow        : 8
NumberOfLinks      : 1
FileIndexHigh      : 327680
FileIndexLow       : 901684
PS > mv a.txt b.txt
PS >  [WindowsFileInfo.Kernel32Api]::GetFileInfo($filepath)
FileAttributes     : 32
CreationTime       : System.Runtime.InteropServices.ComTypes.FILETIME
LastAccessTime     : System.Runtime.InteropServices.ComTypes.FILETIME
LastWriteTime      : System.Runtime.InteropServices.ComTypes.FILETIME
VolumeSerialNumber : 2421491731
FileSizeHigh       : 0
FileSizeLow        : 8
NumberOfLinks      : 1
FileIndexHigh      : 327680
FileIndexLow       : 901684

fsutilでも似た情報を取得可能

同僚に教えてもらいましたが、似たような情報はfsutilでも取得可能です。

PS> fsutil usn readdata .\b.txt

メジャー バージョン   : 0x3
マイナー バージョン     : 0x0
ファイルの参照番号    : 0x0000000000000000008a00000006ff4f
親ファイルの参照番号  : 0x000000000000000000c3000000021499
USN                   : 0x000000026e1def60
タイム スタンプ       : 0x0000000000000000 0:00:00 1601/01/01
理由                  : 0x0
ソース情報            : 0x0
セキュリティ ID       : 0x0
ファイル属性          : 0x20
ファイル名の長さ      : 0xa
ファイル名オフセット  : 0x4c
ファイル名            : b.txt

PowerShellがOSSになりLinux/Mac版と出てきたので触ってみた

Mac/LinuxばかりでWindows触らなくなってもう半年になります。やっとBashが手についてきたこのごろですが、昨日こんなニュースを見つけました。

www.itmedia.co.jp

Windows使っていた時にはお世話になりっぱなしだったPowerShellがまた使えるかもと思い早速試してみました。

基本情報

レポジトリはこちらです。

github.com

そして、インストール手順はこちらです。MacLinuxも記載されています。 github.com

インストール

Mac版のインストールはPKGファイルなので、ダウンロードしてダブルクリック+ウィザードだけ、Linux版のインストールもダウンロードして、yum install するだけです。

Linux版のインストール手順はこちら。

# wget https://github.com/PowerShell/PowerShell/releases/download/v6.0.0-alpha.9/powershell-6.0.0_alpha.9-1.el7.centos.x86_64.rpm

# yum install powershell-6.0.0_alpha.9-1.el7.centos.x86_64.rpm
----省略
 ================================================================================
 Package    アーキテクチャー
                   バージョン      リポジトリー                            容量
================================================================================
インストール中:
 powershell x86_64 6.0.0_alpha.9-1 /powershell-6.0.0_alpha.9-1.el7.centos.x86_64
                                                                          121 M
依存性関連でのインストールをします:
 libicu     x86_64 50.1.2-15.el7   base                                   6.9 M
 libunwind  x86_64 2:1.1-5.el7_2.2 updates                                 56 k

トランザクションの要約
================================================================================
----省略

起動してみる

powershell 起動しました。

$ powershell
PowerShell
Copyright (C) 2016 Microsoft Corporation. All rights reserved.

PS /home/otomo>

バージョン情報の変数も機能しています。

PS /home/otomo> $PSVersionTable

Name                           Value
----                           -----
PSVersion                      6.0.0-alpha
PSEdition                      Core
PSCompatibleVersions           {1.0, 2.0, 3.0, 4.0...}
BuildVersion                   3.0.0.0
GitCommitId                    v6.0.0-alpha.9
CLRVersion
WSManStackVersion              3.0
PSRemotingProtocolVersion      2.3
SerializationVersion           1.1.0.1

少し触ってみる Get-Process + Pipeline

久しぶりにこのパイプライン書いたけど、ちゃんとPowerShellっぽい。

PS /home/otomo> Get-Process | where {$_.ProcessName.Contains("ssh")}

Handles  NPM(K)    PM(K)      WS(K)     CPU(s)     Id  SI ProcessName
-------  ------    -----      -----     ------     --  -- -----------
      0       0        0          1      0.040    868 868 sshd
      0       0        0          1      0.090  11489 489 sshd
      0       0        0          1      0.440  11492 489 sshd

PSDriveも使える

PowerShellは色々な要素をファイルシステムと同じように利用できるのですが、そのPSDriveはWindows以外でも利用できるようです。

PS /home/otomo> Get-PSDrive

Name           Used (GB)     Free (GB) Provider      Root                                      CurrentLocation
----           ---------     --------- --------      ----                                      ---------------
/                   3.05         34.20 FileSystem    /                                              home/otomo
Alias                                  Alias
Cert                                   Certificate   \
Env                                    Environment
Function                               Function
Variable                               Variable

おお、PSDriveしっかり使えてる。

PS /home/otomo> Set-Location Env:
PS Env:/> Get-ChildItem

Name                           Value
----                           -----
_                              /bin/powershell
HISTCONTROL                    ignoredups
HISTSIZE                       1000
HOME                           /home/otomo

コマンドレット数は?

コマンドレットは現時点で345本みたい。手元のWindows10がクリーンインストールで1000本超えてるので、それと比較すれば少ないか。当然と言えば当然ですが。ちなみに同じMacPowerShellも同じ個数です。

PS Env:/> Get-Command | measure | select count

Count
-----
  345
PS Env:/> Get-Command | select name

Name
----
Add-NodeKeys
AddDscResourceProperty
AddDscResourcePropertyFromMetadata
AfterAll
AfterEach
Assert-MockCalled
Assert-VerifiableMocks
BeforeAll
BeforeEach
cd..
cd\
CheckResourceFound
Clear-Host
Compress-Archive
Configuration
Context
ConvertTo-MOFInstance
Describe
Expand-Archive
Find-Command
Find-DscResource
Find-Module
Find-RoleCapability
Find-Script
Format-Hex
Generate-VersionInfo
Get-CompatibleVersionAddtionaPropertiesStr
Get-ComplexResourceQualifier
Get-ConfigurationErrorCount
Get-DscResource
Get-DSCResourceModules
Get-EncryptedPassword
Get-FileHash
Get-InnerMostErrorRecord
Get-InstalledModule
Get-InstalledScript
Get-MockDynamicParameters
Get-MofInstanceName
Get-MofInstanceText
Get-PositionInfo
Get-PSCurrentConfigurationNode
Get-PSDefaultConfigurationDocument
Get-PSMetaConfigDocumentInstVersionInfo
Get-PSMetaConfigurationProcessed
Get-PSRepository
Get-PSTopConfigurationName
Get-PublicKeyFromFile
Get-PublicKeyFromStore
Get-TestDriveItem
Get-Verb
GetCompositeResource
GetImplementingModulePath
GetModule
GetPatterns
GetResourceFromKeyword
GetSyntax
help
Import-PowerShellDataFile
ImportCimAndScriptKeywordsFromModule
ImportClassResourcesFromModule
ImportSystemModules
In
Initialize-ConfigurationRuntimeState
InModuleScope
Install-Module
Install-Script
Invoke-Mock
Invoke-Pester
IsHiddenResource
IsPatternMatched
It
Mock
more
New-DscChecksum
New-Fixture
New-Guid
New-ScriptFileInfo
New-TemporaryFile
Node
oss
Pause
prompt
PSConsoleHostReadline
Publish-Module
Publish-Script
ReadEnvironmentFile
Register-PSRepository
Save-Module
Save-Script
Set-DynamicParameterVariables
Set-NodeExclusiveResources
Set-NodeManager
Set-NodeResources
Set-NodeResourceSource
Set-PSCurrentConfigurationNode
Set-PSDefaultConfigurationDocument
Set-PSMetaConfigDocInsProcessedBeforeMeta
Set-PSMetaConfigVersionInfoV2
Set-PSRepository
Set-PSTopConfigurationName
Setup
Should
StrongConnect
TabExpansion2
Test-ConflictingResources
Test-ModuleReloadRequired
Test-MofInstanceText
Test-NodeManager
Test-NodeResources
Test-NodeResourceSource
Test-ScriptFileInfo
ThrowError
Uninstall-Module
Uninstall-Script
Unregister-PSRepository
Update-ConfigurationDocumentRef
Update-ConfigurationErrorCount
Update-DependsOn
Update-LocalConfigManager
Update-Module
Update-ModuleManifest
Update-ModuleVersion
Update-Script
Update-ScriptFileInfo
ValidateNoCircleInNodeResources
ValidateNodeExclusiveResources
ValidateNodeManager
ValidateNodeResources
ValidateNodeResourceSource
ValidateNoNameNodeResources
ValidateUpdate-ConfigurationData
Write-Log
Write-MetaConfigFile
Write-NodeMOFFile
WriteFile
Add-Content
Add-History
Add-Member
Add-Type
Clear-Content
Clear-History
Clear-Item
Clear-ItemProperty
Clear-Variable
Compare-Object
Connect-PSSession
Convert-Path
ConvertFrom-Csv
ConvertFrom-Json
ConvertFrom-SecureString
ConvertFrom-StringData
ConvertTo-Csv
ConvertTo-Json
ConvertTo-SecureString
ConvertTo-Xml
Copy-Item
Copy-ItemProperty
Debug-Job
Debug-Process
Debug-Runspace
Disable-PSBreakpoint
Disable-PSSessionConfiguration
Disable-RunspaceDebug
Disconnect-PSSession
Enable-PSBreakpoint
Enable-PSSessionConfiguration
Enable-RunspaceDebug
Enter-PSHostProcess
Enter-PSSession
Exit-PSHostProcess
Exit-PSSession
Export-Alias
Export-Clixml
Export-Csv
Export-FormatData
Export-ModuleMember
Find-Package
Find-PackageProvider
ForEach-Object
Format-Custom
Format-List
Format-Table
Format-Wide
Get-Alias
Get-ChildItem
Get-Command
Get-Content
Get-Credential
Get-Culture
Get-Date
Get-Event
Get-EventSubscriber
Get-ExecutionPolicy
Get-FormatData
Get-Help
Get-History
Get-Host
Get-Item
Get-ItemProperty
Get-ItemPropertyValue
Get-Job
Get-Location
Get-Member
Get-Module
Get-Package
Get-PackageProvider
Get-PackageSource
Get-Process
Get-PSBreakpoint
Get-PSCallStack
Get-PSDrive
Get-PSHostProcessInfo
Get-PSProvider
Get-PSReadlineKeyHandler
Get-PSReadlineOption
Get-PSSession
Get-PSSessionCapability
Get-PSSessionConfiguration
Get-Random
Get-Runspace
Get-RunspaceDebug
Get-TraceSource
Get-TypeData
Get-UICulture
Get-Unique
Get-Variable
Group-Object
Import-Alias
Import-Clixml
Import-Csv
Import-LocalizedData
Import-Module
Import-PackageProvider
Install-Package
Install-PackageProvider
Invoke-Command
Invoke-Expression
Invoke-History
Invoke-Item
Invoke-RestMethod
Invoke-WebRequest
Join-Path
Measure-Command
Measure-Object
Move-Item
Move-ItemProperty
New-Alias
New-Event
New-Item
New-ItemProperty
New-Module
New-ModuleManifest
New-Object
New-PSDrive
New-PSRoleCapabilityFile
New-PSSession
New-PSSessionConfigurationFile
New-PSSessionOption
New-PSTransportOption
New-TimeSpan
New-Variable
Out-Default
Out-File
Out-Host
Out-Null
Out-String
Pop-Location
Push-Location
Read-Host
Receive-Job
Receive-PSSession
Register-ArgumentCompleter
Register-EngineEvent
Register-ObjectEvent
Register-PackageSource
Register-PSSessionConfiguration
Remove-Event
Remove-Item
Remove-ItemProperty
Remove-Job
Remove-Module
Remove-PSBreakpoint
Remove-PSDrive
Remove-PSReadlineKeyHandler
Remove-PSSession
Remove-TypeData
Remove-Variable
Rename-Item
Rename-ItemProperty
Resolve-Path
Save-Help
Save-Package
Select-Object
Select-String
Select-Xml
Set-Alias
Set-Content
Set-Date
Set-ExecutionPolicy
Set-Item
Set-ItemProperty
Set-Location
Set-PackageSource
Set-PSBreakpoint
Set-PSDebug
Set-PSReadlineKeyHandler
Set-PSReadlineOption
Set-PSSessionConfiguration
Set-StrictMode
Set-TraceSource
Set-Variable
Sort-Object
Split-Path
Start-Job
Start-Process
Start-Sleep
Start-Transcript
Stop-Job
Stop-Process
Stop-Transcript
Tee-Object
Test-ModuleManifest
Test-Path
Test-PSSessionConfigurationFile
Trace-Command
Uninstall-Package
Unregister-Event
Unregister-PackageSource
Unregister-PSSessionConfiguration
Update-FormatData
Update-Help
Update-TypeData
Wait-Debugger
Wait-Event
Wait-Job
Wait-Process
Where-Object
Write-Debug
Write-Error
Write-Host
Write-Information
Write-Output
Write-Progress
Write-Verbose
Write-Warning

PowerShellのWhere-Object句のパフォーマンスが遅いので対応例

PowerShellパイプラインは手元で使っている分には凄い便利ですが、大量のデータを扱うとしばしばパフォーマンスがとても遅くなる場合があります。

PowerShellのWhere-Objectは便利なので使うことが多いと思います。しかし大きな処理をすると問題になることが多い部分です。例えば手元にあった以下のようなスクリプトの場合はWhere-Objectをforeachで書き換えただけで5分の1程度に処理時間が短縮できました。

Whereパターン

$filteredEntries = $10000Entries | Where{($_.Key -eq $Key) -and ($_.Id -eq $id) -and ($_.Value)}

書き直しパターン

foreach($e in $10000Entries)
{
    if(($e.Key -eq $Key) -and ($e.Id -eq $id) -and ($e.Value))
    {
        $filteredEntries += $e
    }	
}


計測してみた

しっかり計測してみました。

$loop = 10000
$randomNums = @()
for ($i = 1; $i -lt $loop; $i++)
{ 
    $randomNums += Get-Random -Maximum 99999 -Minimum 10000    
}

$nums1 = @()
$nums2 = @()
$nums3 = @()
$result1 = (Measure-Command{
            $nums1 = $randomNums | Where-Object{$_ -match "23"}
      })

$result2 = (Measure-Command{
            #この方法だけSystem.Collections.ObjectModel.Collection`の型になります
            $nums2 = $randomNums.Where({$_ -match "23"})
      })

$result3 = (Measure-Command{
            foreach ($num in $randomNums)
            {
                if($num -match "23")
                {
                    $nums3 += $num
                }
            }
      })


"1. Where-Object  :{0}" -f $result1.TotalMilliseconds 
"2. where Method  :{0}" -f $result2.TotalMilliseconds
"3. foreach句   :{0}" -f $result3.TotalMilliseconds


結果は下の表の通り明らかにforeachステートメントが一番早いですね。ISEにコピペで検証できるのでやってみてください。

No 方法 1回目 2回目 3回目
1 Where-Object 315.2737 407.667 324.9565
2 where Method 103.7537 136.2756 106.9086
3 foreach句 54.4612 61.2299 46.6986

まとめ

コンソールからダイアログで作業する分にはとても便利なパイプラインですが、大きな処理の場合は無視できない遅延を招く可能性があります。その場合は、foreach句の利用も検討した方が良いかもしれません。

12桁のAWSアカウントIDをPowerShellで取得する

取得するためのCmdletが見つからなかったので、やり方を模索してみました。


メタデータのIAM情報から取得してみる。(正規表現

PS>(Invoke-WebRequest "http://169.254.169.254/latest/meta-data/iam/info").Content -match "arn:.*:.*:.*:[0-9]{12}:.*" | %{$matches[0] -split ":"| select -index 4}
012345678912


メタデータのIAM情報から取得してみる。JSONを読み取ってARN変換。ARNの5個目の項目を取得。

PS>((Invoke-WebRequest "http://169.254.169.254/latest/meta-data/iam/info").Content | ConvertFrom-Json).InstanceProfileArn -split ":" | select -Index 4
012345678912


ARNを取ればよいという事なら他の取り方もありますね。

PS>(Get-IAMUsers)[0].Arn -split ":" | select -Index 4
012345678912

ARN以外だとリソースのOwnerもアカウントID。

PS>(Get-EC2SecurityGroup -GroupName "Default").OwnerId
012345678912

実行しているEC2インスタンスのOwnerを取得してみたり。

PS>(Get-EC2Instance -Instance (Invoke-WebRequest "http://169.254.169.254/latest/meta-data/instance-id").Content).OwnerId
012345678912


今のところ一番マシ。

PS>((Invoke-WebRequest "http://169.254.169.254/latest/dynamic/instance-identity/document").Content | ConvertFrom-Json).accountId
012345678912


どれも微妙ですね。もっと良い方法見つけたら追記します。

AWS Tools for PowerShellで別アカウントの処理を実行する(Cross Account)

EC2からAWS Tools for PowerShellを利用する際に、クロスアカウントアクセスロールを利用して別のAWSアカウントの操作をする方法を書いていきます。

具体的には、
アカウントAAWSの情報を、
アカウントBのEC2上で実行するPowerShellから、
AWS Tools for PowerShellにて操作する、
方法を例を使いながら書いていきます。

アカウントA作業

まずはアカウントAの作業です。アカウントAのManagement Consoleにログオンします。

クロスアカウントロール作成

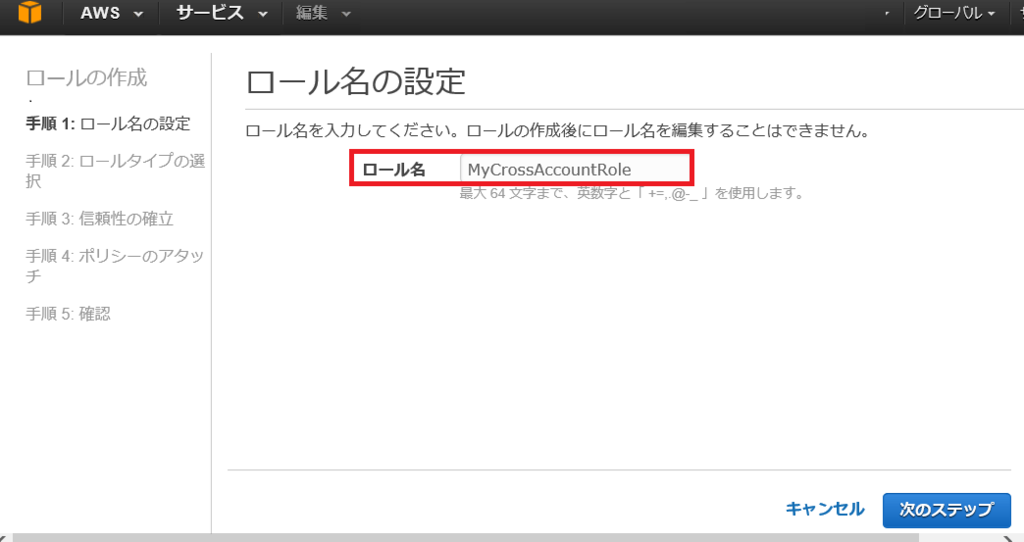
MyCrossAccountRoleというロールを作成します。

 
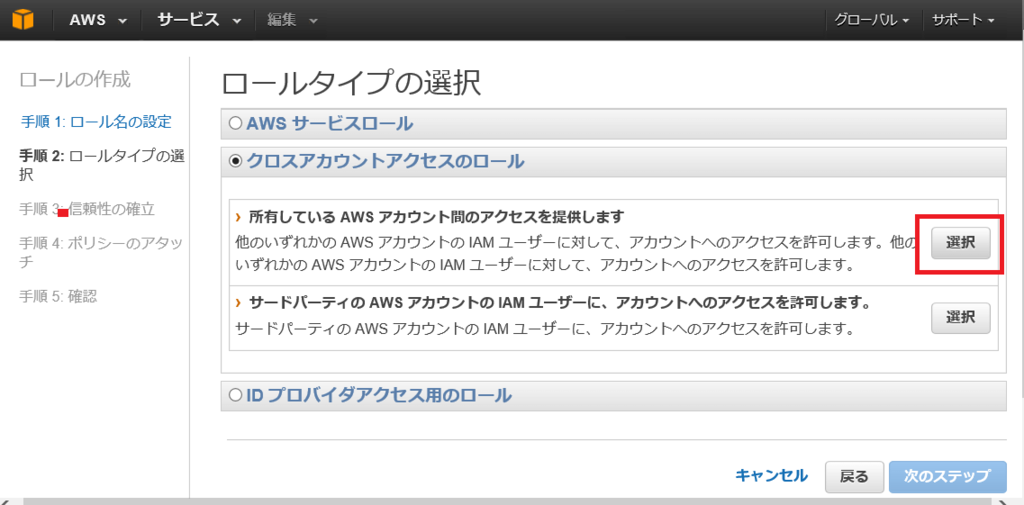
クロスアカウントアクセスのロールを選択していきます。

 
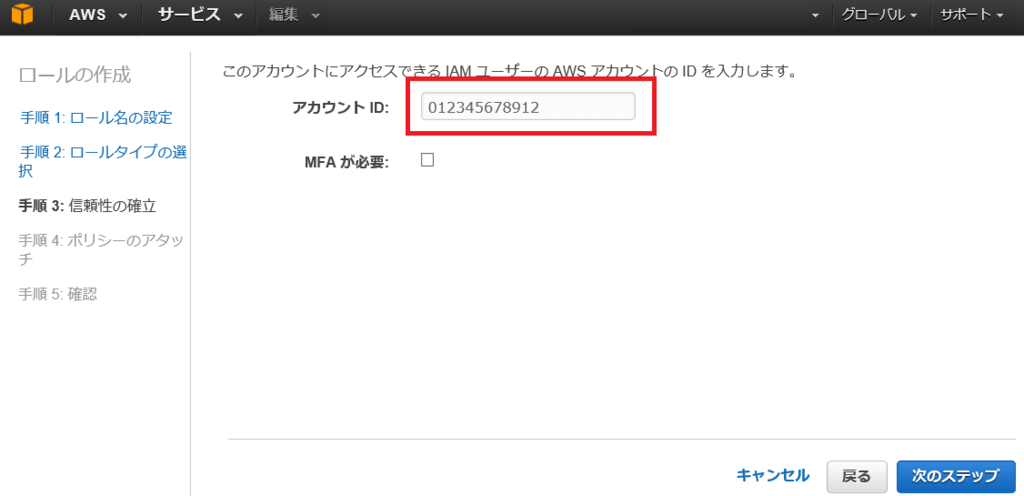
アカウントIDにはアカウントBのアカウントID(12桁)を入れます。

 
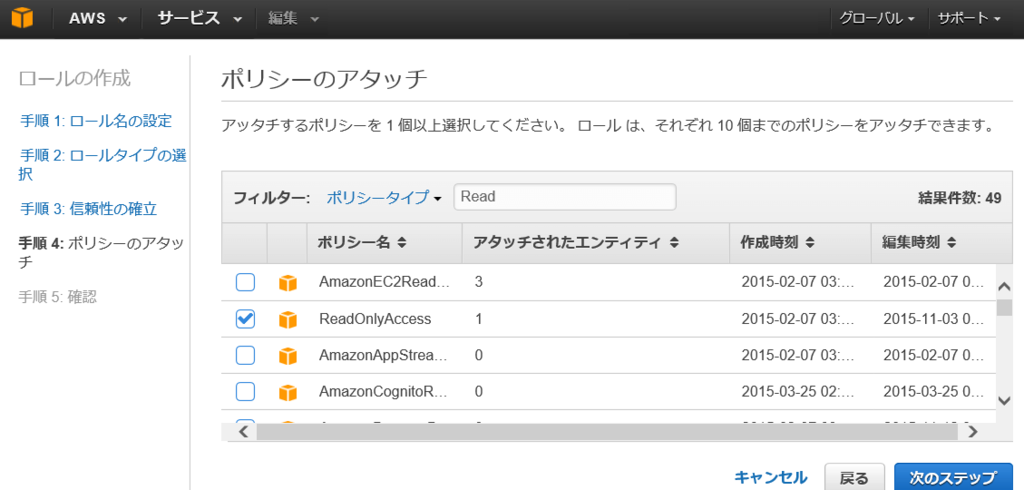
適当なポリシーを選択しロールにアタッチします。

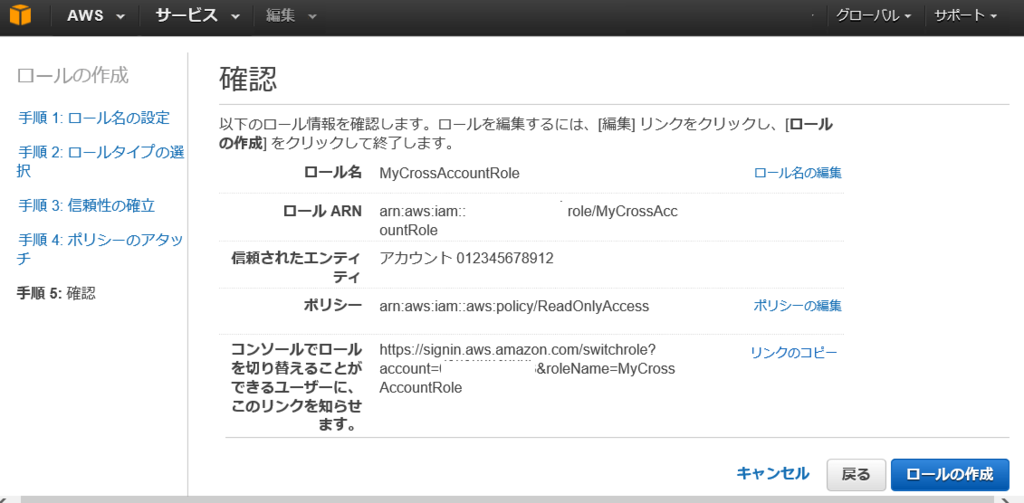
内容を確認してロールの作成をします。

内容を確認してロールを作成します。ロールのARNを覚えておきましょう。

arn:aws:iam::999999999999:role/MyCrossAccountRole


これでアカウントA側の作業は完了です。アカウントBのEC2上のPowerShellからアクセスした際には、ここで作ったロールの権限でアクセスされます。

アカウントB作業

アカウントBのEC2インスタンスからPowerShellを使ってアカウントAを操作してみます。

EC2ロールにポリシー追加

アカウントBのManagement Consoleにログオンして、以下のポリシーを追加しておきます。このポリシーを付与したロールをPowerShellを実行するEC2に割り当ててください。

{
  "Version": "2012-10-17",
  "Statement": [
    {
      "Effect": "Allow",
      "Action": ["sts:AssumeRole"],
      "Resource": ["*"]
    }
  ]
}


PowerShellスクリプトアカウントAを操作

EC2から以下のスクリプトを実行します。

#適当なリージョンを設定してください
$region = "ap-northeast-1"

#アカウントAで作成したロールのARN
$roleARN = "arn:aws:iam::999999999999:role/MyCrossAccountRole"
#ログなどセッションを特定するために使われる名前です。任意の文字列でOK。
$sessoinName = "MySession" 

$sts = Use-STSRole -Region $region -RoleArn $roleARN -RoleSessionName $sessoinName
Get-IAMUsers -Credential $sts.Credentials

アカウントB上のEC2インスタンスからアカウントAのIAMユーザの一覧が取得できたと思います。なお、Credentialの引数にNull値を渡した場合はアカウントBのIAMユーザが取得されます。


Proxy経由でAWS Tools for PowerShellを利用する時にひっかかった点

プロキシは正しく設定されていて、EC2にも正しいロールが設定されている。にも関わらず以下のようなメッセージでAWSのコマンドレットが失敗してしまう。認証がうまくいっていないようです。

No credentials specified or obtained from persisted/shell defaults

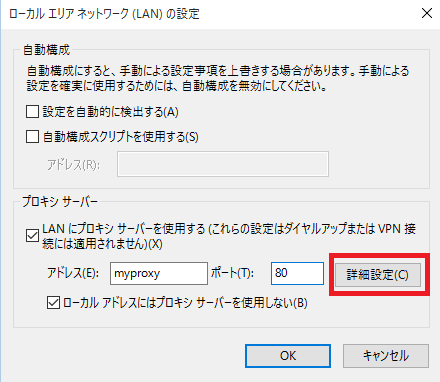
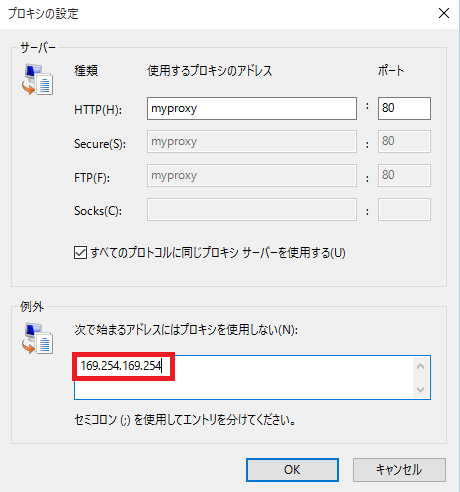
このような場合、結論から言うとプロキシの設定の例外に169.254.169.254を追加してやればOKの場合があります。


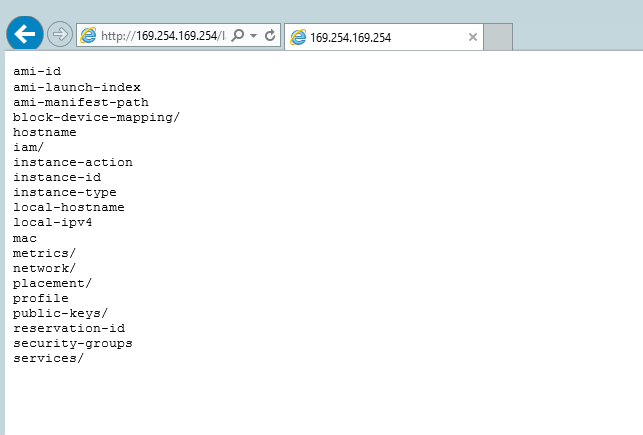
EC2上のブラウザから以下のURLにアクセスしてメタデータが見えることを確認してから、再度コマンドを実行してみましょう。

http://169.254.169.254/latest/meta-data/

なぜ、169.254.169.254にアクセスできると認証の問題が解決するのか詳しく知りたい場合はこちにわかりやすく説明されています。dev.classmethod.jp

【PowerShell】クラス名わからないけどWMIを使ってOS情報を取得したい

WMIを使ってOSの情報をコマンドで取得するのに便利なGet-WmiObjectですが、肝心のWMIクラス名がわからない場合の手っ取り早い方法です。

PowerShellコンソール開いて以下をコピペで実行します。

PS> gwmi -List | Out-GridView -PassThru | %{gwmi -Class $_.Name}
 

GridViewが表示されるので、検索まどに単語を入れます。
Diskを見てみたいのでWin32とDiskで検索します。 後は該当しそうな名前のクラスを選んでOKするだけです。

コンソールに情報が表示されます。

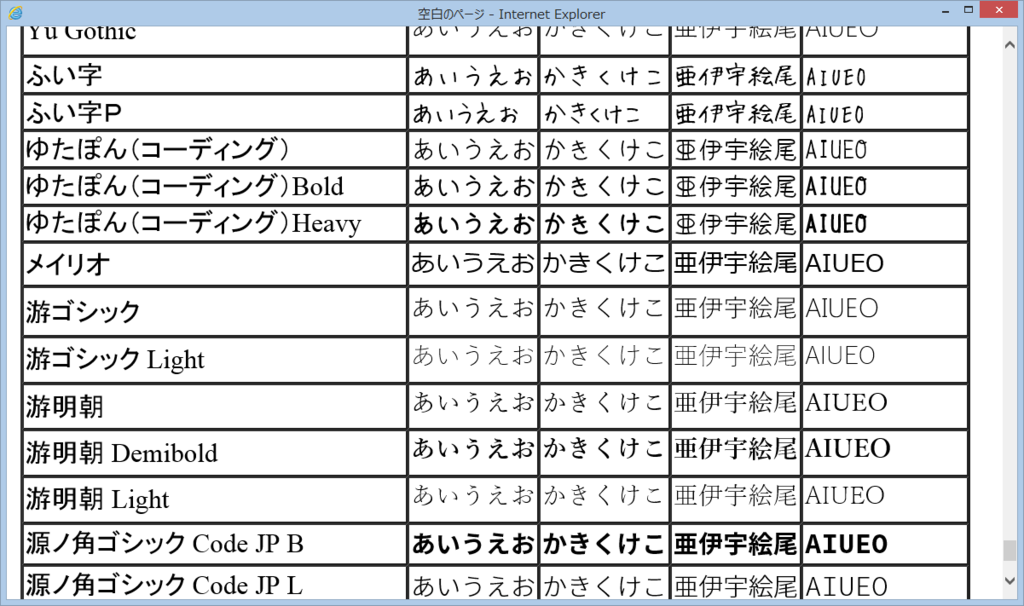
インストール済みのフォントを見やすく一覧するPowerShellスクリプト(日本語対応版)

フォントを選ぶときに簡単に一覧を出したいと思い調べてみたら、インストール済みのフォントの一覧をIEブラウザに一覧してくれる大変便利なスクリプトが見つかりました。

https://technet.microsoft.com/en-us/library/ff730944.aspx

  ただ、これだと日本語特有のひらがな、カタカナ、漢字に対応できなかったので、少しだけ改造してみました。  

$Hiragana  = "あいうえお"
$Katakana  = "かきくけこ"
$Kanji     = "亜伊宇絵尾"
$Eigo      = "AIUEO"

[void] [System.Reflection.Assembly]::LoadWithPartialName("System.Drawing")
$objFonts = New-Object System.Drawing.Text.InstalledFontCollection
$colFonts = $objFonts.Families

$objIE = New-Object -com "InternetExplorer.Application"
$objIE.Navigate("about:blank")
$objIE.ToolBar = 0
$objIE.StatusBar = 0
$objIE.Visible = $True

$objDoc = $objIE.Document.DocumentElement.LastChild 
$strHTML = ""
$strHTML += '<table border="1" cellspacing="0" bordercolor="#000000" align="left">'
foreach ($objFont in $colFonts)
    {
        $style =    "style=`"font-size : 15px; font-family : $($objFont.Name)`""
        $strHTML += "<tr><td>$($objFont.Name)</td>"
        $strHTML += "<td $style>$Hiragana</td>"
        $strHTML += "<td $style>$Katakana</td>"
        $strHTML += "<td $style>$Kanji</td>"
        $strHTML += "<td $style>$Eigo</td>"
        $strHTML += "</tr>"
    }
$strHTML += "</table>"


$objDoc.InnerHTML = $strHTML


きれいに表示されました! これで今後はフォント選びが楽になりそうです。    

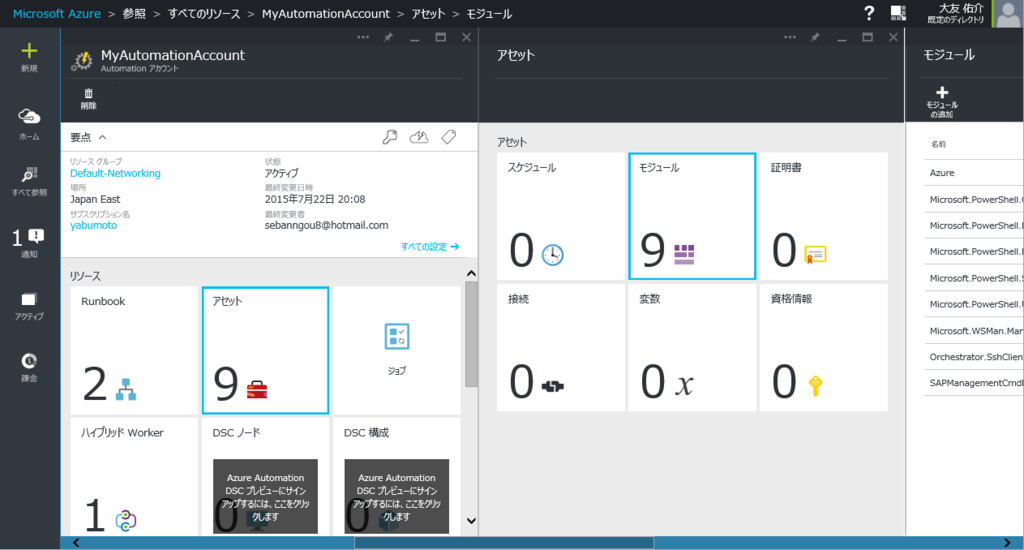
C#クラスライブラリ(DLL)をAzure Automationで利用する方法

Azure上からIT管理の自動化ができるAzure Automationですが、Igniteやde:codeを見ていても、Microsoftの自動化ツールの中心になっていくのではと思っています。solution.realtech.jp


Azure Automationでは実行エンジンとしてPowerShell Workflowを使っています。このため、自動化の実装で利用できるのはPowerShellのみです。


C#のクラスライブラリを使いたい場合はPowerShellを通して呼び出すことになります。ここでは、Azure AutomationでC#ライブラリを使う方法の一例を書こうと思います。


クラスライブラリ

以下のような「MyClassLibrary.dll」というDLLを持っていたとします。これをAzure Automationで使いたいです。

using System;

namespace MyClassLibrary
{
    public class MyMessage
    {
        public static string GetMessage(string Name)
        {
            return String.Format("Hello {0} !", Name);
        }
    } 
}

PowerShellコマンドレット

以下のように参照にSystem.Management.Automationを追加して、PowerShellコマンドレットを開発ます。ここから先程のDLLを呼び出しています。

DLLファイル名は「GetMessageCmdlet.dll」とします。

using System;
using System.Management.Automation;
using MyClassLibrary;

namespace GetMessageCmdlet
{
    [Cmdlet(VerbsCommon.Get, "HelloMessage")]
    public class GetHelloMessage : Cmdlet
    {
        [Parameter]
        public string Name { get; set; }

        protected override void ProcessRecord()
        {
            WriteObject(MyMessage.GetMessage(Name));
        }        
    }
}

PowerShell Module化

SampleCmdletというフォルダを作成し、そこにPowerShellマニュフェストファイルを出力します。

New-ModuleManifest .\SampleCmdlet\SampleCmdlet.psd1

ファイルの中身を以下のように書き換えます。

#省略
RootModule = 'SampleCmdlet.dll'
#省略
NestedModules = @('MyClassLibrary.dll')
#省略


この時点でPowerShellモジュールのフォルダ構造ができました。モジュールをインポートして利用できるところまで確認できます。

PS> gci .\SampleCmdlet
Mode                LastWriteTime     Length Name
----                -------------     ------ ----
-a---        2015/07/24     21:43       4608 GetMessageCmdlet.dll
-a---        2015/07/24     21:43       4608 MyClassLibrary.dll
-a---        2015/07/24     21:45       4014 SampleCmdlet.psd1
PS> Import-Module .\SampleCmdlet
PS> Get-Module
ModuleType Version    Name                                ExportedCommands
---------- -------    ----                                ----------------
Binary     1.0        SampleCmdlet                        Get-HelloMessage
PS> Get-HelloMessage -Name yomon8
Hello yomon8 !

PowerShellモジュールをAzure Automationにアップロードして使う

まずはモジュールのフォルダ「.\SampleCmdlet」をZIPにします。「SampleCmdlet.zip」とします。


Azure Preview Portalからアップロードしてみます。
Azure Automationアカウント>アセット>モジュール>モジュールの追加でZIPファイルをアップロードします。
f:id:yomon8:20150725001308p:plain

モジュールの読み込みが終わるまで数分待ちます。
f:id:yomon8:20150725001319p:plain

読み込みが完了すればRunbookのコマンドレットとして使えるようになります。
f:id:yomon8:20150725001325p:plain

実行すれば、DLLを使って処理が動いていることがわかります。
f:id:yomon8:20150725001332p:plain


注意点

Azure Automationが実際に実行されているのはWindows Serverのはずですが、それでも手元のWindowsで動く全てのクラスライブラリが動くわけではありません。

WMIなどは使えないようですが、.Netの標準ライブラリは使えるので、それでOSの情報などを取得するとヒントになるかもしれません。yomon.hatenablog.com


Hybrid Workerを使ったオンプレミス環境などの自動化を行う場合は、Hybrid Worker側のOSにPowerShellモジュールをインストールします。PSModulePathに配置したり、Import-Moduleで明示的にインポートすれば使えます。

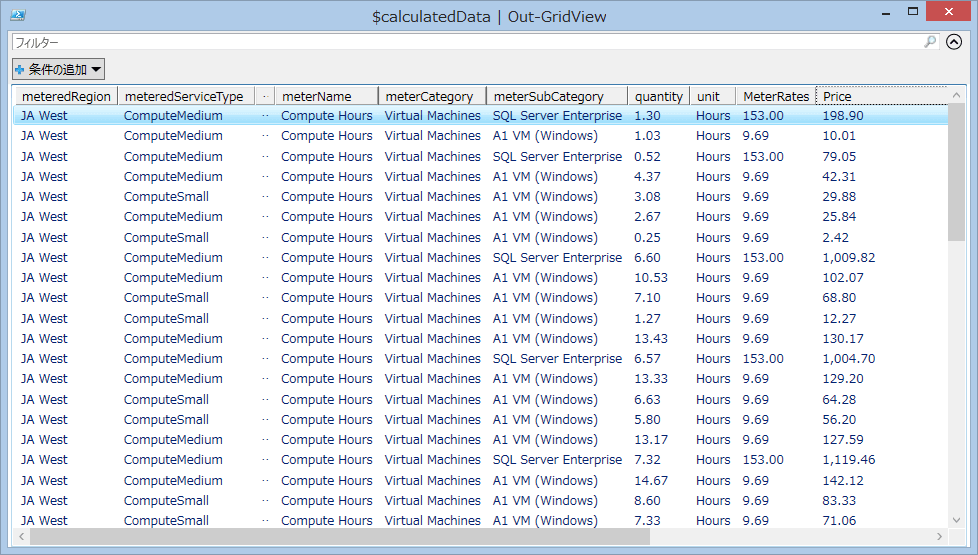
Azure Billing API(課金API)をPowerShellから試してみた

Azureの課金情報取得のAPIが遂に出ました。weblogs.asp.net


早速、こちらの記事で認証方法などを参考に、課金レートのAPIも組み合わせて作ってみました。blogs.technet.com


仕様は以下の通り

  • 取得日から過去30日分のデータを対象
  • 対象のデータは仮想マシンの稼働データのみ(※Storageなどカテゴリによっては若干特性がありそうなので、それぞれ調整が必要そうです)
  • 出力はとりあえずOut-GridView
  • データは日次ベース(時間ベースの取得も可能)
  • 料金プランは従量課金契約の課金データをベース(変数offerDurableIDをこちらのURLに合わせて変更できます)
  • 現時点では仮想マシンの場合、個別の仮想マシン情報までは取れなくて、クラウドサービス毎までの情報しか取れないようです。将来instanceDataのフィールドが取れるようになれば個別の仮想マシンのデータもいけるようになるかも


# 日付設定(30日前から実行日までのデータ取得)
$reportedStartTime = (Get-Date).AddDays(-30).ToString("yyyy-MM-dd")
$reportedEndTime = (Get-Date).ToString("yyyy-MM-dd")

# Azure認証設定
Add-AzureAccount
$subscriptionId = 
    (Get-AzureSubscription |
     Out-GridView `
        -Title "Select an Azure Subscription ..." `
        -PassThru).SubscriptionId

$adTenant = 
    (Get-AzureSubscription `
        -SubscriptionId $subscriptionId).TenantId

# REST API実行用パラメータ設定
$clientId = "1950a258-227b-4e31-a9cf-717495945fc2" # Well-known client ID for Azure PowerShell
$redirectUri = "urn:ietf:wg:oauth:2.0:oob" # Redirect URI for Azure PowerShell
$resourceAppIdURI = "https://management.core.windows.net/" # Resource URI for REST API
$authority = "https://login.windows.net/$adTenant" # Azure AD Tenant Authority


# Load ADAL Assemblies
$programDir = ${env:ProgramFiles(x86)}
if(!$programDir)
{
    $programDir = ${env:ProgramFiles}
}
$adal = "$programDir\Microsoft SDKs\Azure\PowerShell\ServiceManagement\Azure\Services\Microsoft.IdentityModel.Clients.ActiveDirectory.dll"
$adalforms = "$programDir\Microsoft SDKs\Azure\PowerShell\ServiceManagement\Azure\Services\Microsoft.IdentityModel.Clients.ActiveDirectory.WindowsForms.dll"
Add-Type -Path $adal
Add-Type -Path $adalforms

# Create Authentication Context tied to Azure AD Tenant
$authContext = New-Object -TypeName "Microsoft.IdentityModel.Clients.ActiveDirectory.AuthenticationContext"  -ArgumentList $authority

# Acquire Azure AD token
$authResult = $authContext.AcquireToken($resourceAppIdURI, $clientId, $redirectUri, "Auto")

# Create Authorization Header
$authHeader = $authResult.CreateAuthorizationHeader()

# Set REST API parameters
$apiVersion = "2015-06-01-preview"
$granularity = "Daily" # Can be Hourly or Daily
$showDetails = "true"
$contentType = "application/json;charset=utf-8"

# Set HTTP request headers to include Authorization header
$requestHeader = @{"Authorization" = $authHeader}

# 課金情報の基になるリソース利用状況を REST APIから取得(今回は仮想マシン部分のみ)
$usageUri = "https://management.azure.com/subscriptions/$subscriptionId/providers/Microsoft.Commerce/UsageAggregates?api-version=$apiVersion&reportedStartTime=$reportedStartTime&reportedEndTime=$reportedEndTime&aggregationGranularity=$granularity&showDetails=$showDetails"
$vmMeterName     = "Compute Hours"
$vmMeterCategory = "Virtual Machines"
$vmUsageData = @()
Do {

    $usageData = Invoke-RestMethod `
        -Uri $usageUri `
        -Method Get `
        -Headers $requestHeader `
        -ContentType $contentType

    $vmUsageData += $usageData.value.properties | 
        where{
                ($_.MeterName -eq $vmMeterName) -and
                ($_.MeterCategory -eq $vmMeterCategory)
            } | select usageStartTime,usageEndTime,meterName,meterCategory,meterSubCategory,unit,quantity -ExpandProperty infoFields
    $usageUri = $usageData.nextLink
} until (!$usageUri)


# 課金レートの基になる情報を REST APIから取得(今回は従量課金プランを利用)
$offerDurableID = "MS-AZR-0003p" #参照URL http://azure.microsoft.com/en-us/support/legal/offer-details/
$currency = "JPY"
$locale = "en-US"
$region = "JP"
$rateCardUri = "https://management.azure.com/subscriptions/$subscriptionId/providers/Microsoft.Commerce/RateCard?api-version=$apiVersion`&`$filter=OfferDurableId eq '$offerDurableID' and Currency eq '$currency' and Locale eq '$locale' and RegionInfo eq '$region'"
$rateCardData = Invoke-RestMethod `
        -Uri $rateCardUri `
        -Method Get `
        -Headers $requestHeader `
        -ContentType $contentType


#リソース利用状況と課金レートから価格kを計算
$calculatedData = @()
foreach($data in $vmUsageData)
{
    $rateInfo = $rateCardData.Meters | 
        where{
            ($_.MeterName -eq $data.meterName) -and 
            ($_.MeterCategory -eq $data.meterCategory) -and 
            ($_.MeterSubCategory -eq $data.meterSubCategory) -and
            ($_.Unit -eq $data.unit)
            }
    
    $price = 0
    if($rateInfo)
    {
        $rateData = $rateInfo | where{$_.MeterRegion -eq $data.meteredRegion}
        if(!$rateData)
        {
            $rateData = $rateInfo | where{!$_.MeterRegion}
        }
        $price = ($rateData.MeterRates.0) * $data.quantity
    }
    $calculatedData += $data |
        Add-Member -NotePropertyName MeterRates -NotePropertyValue ($rateData.MeterRates.0) -PassThru |
        Add-Member -NotePropertyName Price -NotePropertyValue $price -PassThru 

}

# GridViewに出力
$calculatedData | Out-GridView

f:id:yomon8:20150630132046p:plain


2015/07/15追記

Azure Resource ManagerのPowerShellコマンドレットを使って書き換えてみました。

# 日付設定(30日前から実行日までのデータ取得)
$reportedStartTime = (Get-Date).AddDays(-30).ToString("yyyy-MM-dd")
$reportedEndTime = (Get-Date).ToString("yyyy-MM-dd")
Switch-AzureMode -Name AzureResourceManager

# Azure認証設定
Add-AzureAccount
Get-AzureSubscription | Out-GridView -Title "Select an Azure Subscription ..." -PassThru | Select-AzureSubscription


# Set API parameters
$apiVersion = "2015-06-01-preview"
$granularity = "Daily" # Can be Hourly or Daily
$showDetails = "true"
$contentType = "application/json;charset=utf-8"


# 課金情報の基になるリソース利用状況を REST APIから取得(今回は仮想マシン部分のみ)
$granularity = "Daily"
$showDetails = $true
$vmUsageData = @()
$continuationToken = $null
$vmMeterName     = "Compute Hours"
$vmMeterCategory = "Virtual Machines"

Do {

    $usageData = Get-UsageAggregates `
        -ReportedStartTime $reportedStartTime `
        -ReportedEndTime $reportedEndTime `
        -AggregationGranularity $granularity `
        -ShowDetails:$showDetails `
        -ContinuationToken $continuationToken
    $vmUsageData += $usageData.UsageAggregations.properties |
                        where{
                            ($_.MeterName -eq $vmMeterName) -and
                            ($_.MeterCategory -eq $vmMeterCategory)
                        } | select usageStartTime,usageEndTime,meterName,meterCategory,meterSubCategory,unit,quantity -ExpandProperty infoFields
       

    if ($usageData.NextLink) {

        $continuationToken = `
            [System.Web.HttpUtility]::`
            UrlDecode($usageData.NextLink.Split("=")[-1])

    } else {

        $continuationToken = ""

    }
} until (!$continuationToken)


# 課金レートの基になる情報を REST APIから取得(今回は従量課金プランを利用)
$offerDurableID = "MS-AZR-0003p" #参照URL http://azure.microsoft.com/en-us/support/legal/offer-details/
$currency = "JPY"
$locale = "en-US"
$region = "JP"
$rateCardUri = "https://management.azure.com/subscriptions/$subscriptionId/providers/Microsoft.Commerce/RateCard?api-version=$apiVersion`&`$filter=OfferDurableId eq '$offerDurableID' and Currency eq '$currency' and Locale eq '$locale' and RegionInfo eq '$region'"
$rateCardData = Invoke-RestMethod `
        -Uri $rateCardUri `
        -Method Get `
        -Headers $requestHeader `
        -ContentType $contentType


#リソース利用状況と課金レートから価格kを計算
$calculatedData = @()
foreach($data in $vmUsageData)
{
    $rateInfo = $rateCardData.Meters | 
        where{
            ($_.MeterName -eq $data.meterName) -and 
            ($_.MeterCategory -eq $data.meterCategory) -and 
            ($_.MeterSubCategory -eq $data.meterSubCategory) -and
            ($_.Unit -eq $data.unit)
            }
    
    $price = 0
    if($rateInfo)
    {
        $rateData = $rateInfo | where{$_.MeterRegion -eq $data.meteredRegion}
        if(!$rateData)
        {
            $rateData = $rateInfo | where{!$_.MeterRegion}
        }
        $price = ($rateData.MeterRates.0) * $data.quantity
    }
    $calculatedData += $data |
        Add-Member -NotePropertyName MeterRates -NotePropertyValue ($rateData.MeterRates.0) -PassThru |
        Add-Member -NotePropertyName Price -NotePropertyValue $price -PassThru 

}

# GridViewに出力
$calculatedData | Out-GridView

ドメイン名、ユーザ名と関連するSIDを相互変換するPowerShellスクリプト

Windowsドメイン名やユーザ名とSIDを相互変換するPowerShellスクリプトを作ってみました。エラーハンドリング無しです。


function Convert-UserAndSid
{
    [CmdletBinding()]
    [OutputType([String])]
    Param
    (
        # パラメーター 1 のヘルプの説明
        [Parameter(Mandatory=$true,ParameterSetName='USER')]
        [String]$UserName,
        [Parameter(Mandatory=$false,ParameterSetName='USER')]
        [String]$DomainName,
        [Parameter(Mandatory=$true,ParameterSetName='SID')]
        [String]$Sid

    )
    if((-not $DomainName) -and $UserName)
    {
        (New-Object System.Security.Principal.NTAccount($UserName)).Translate([System.Security.Principal.SecurityIdentifier]).Value
    }
    elseif($DomainName -and $UserName)
    {
        (New-Object System.Security.Principal.NTAccount($DomainName,$UserName)).Translate([System.Security.Principal.SecurityIdentifier]).Value
    }
    elseif($Sid)
    {
        (New-Object System.Security.Principal.SecurityIdentifier($Sid)).Translate([System.Security.Principal.NTAccount]).Value
    }
}


使用例①(ローカルユーザ⇒SID)

PS> Convert-UserAndSid -UserName myUser
S-X-X-XX-XXXXXXXXXX-XXXXXXXXX-XXXXXXXXXX-XXX

使用例②(ドメインユーザ⇒SID)

PS> Convert-UserAndSid -DomainName myDomain -UserName myUser
S-Y-Y-YY-YYYYYYYYYY-YYYYYYYYYY-YYYYYYYYYY-YYY

使用例③(SID⇒ユーザ名)

PS> Convert-UserAndSid -Sid S-X-X-XX-XXXXXXXXXX-XXXXXXXXX-XXXXXXXXXX-XXX
MyPC\myUser
PS> Convert-UserAndSid -Sid S-Y-Y-YY-YYYYYYYYYY-YYYYYYYYYY-YYYYYYYYYY-YYY
MyDomain\myUser

PowerShellコンソールを拡張できるPSReadLineが良さそう

Hey, Scripting Guy!の以下の記事にPowerShell Consoleが拡張できるPSReadLineについて書いてあって、一目見て便利そうなので設定してみました。

blogs.technet.com


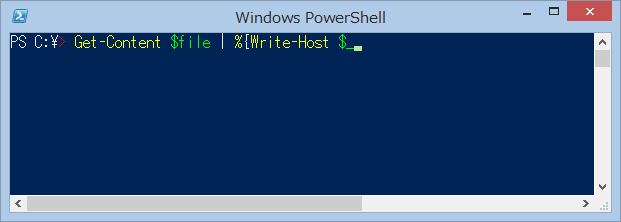
何ができるかと言えば以下の画面で一目でわかると思います。PowerShellコンソールでコマンドに色が付いてます。シンタックスハイライトができてます。
f:id:yomon8:20150429222302p:plain


インストール

PSGet使うと簡単なのでPSGetをまずはインストールします。
PsGet - PowerShell Modules Directory - Get started

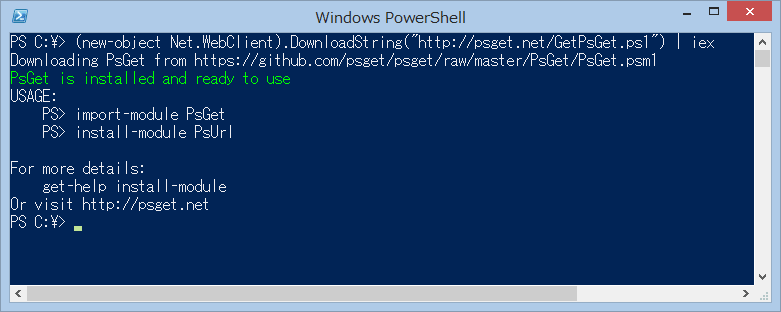
インストールは簡単です。コンソールから以下のコマンドを叩くだけです。GitHubから自動でPSGetをインストールしてくれます。

(new-object Net.WebClient).DownloadString("http://psget.net/GetPsGet.ps1") | iex

f:id:yomon8:20150429222716p:plain


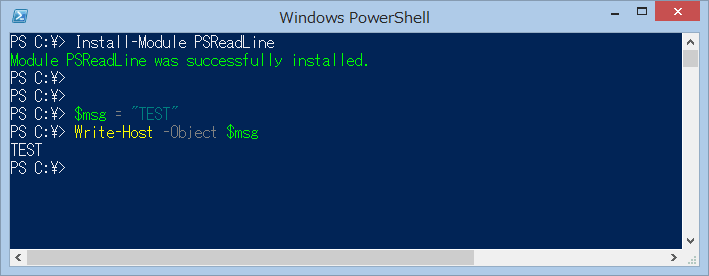
次にPSReadLineをインストールします。こちらもコマンド一本です。インストール後即時でシンタックスハイライトが効いています。

Install-Module PSReadLine

f:id:yomon8:20150429223155p:plain


起動時に自動でPSReadLineを使える状態にする

このままだとコンソールを閉じて、次回起動したときにはPSReadLineは読み込まれていない状態です。以下のコマンド一本で読み込めるのですが、面倒なので起動時に自動で読み込むように設定します。

Import-Module PSReadLine


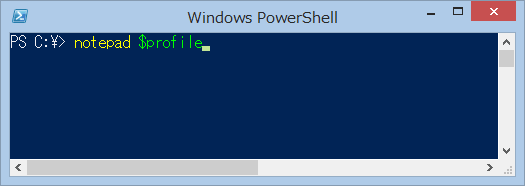
PowerShellコンソールを開き以下のコマンドを実行します。これでPowerShellコンソールのプロファイルをメモ帳で開けます。

notepad $profile

f:id:yomon8:20150429223443p:plain
 

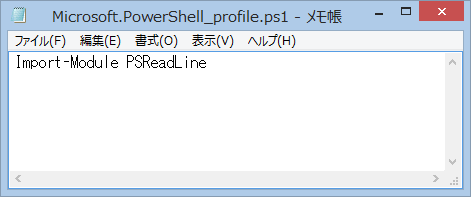
メモ帳にPSReadLineの読み込みコマンドを追記して保存します。これで次回起動時にもPSReadLineが読み込まれている状態になるはずです。
f:id:yomon8:20150429223552p:plain


シンタックスハイライト以外の機能

まず簡易なシンタックスチェックができるようです。括弧の付け忘れ程度のようですが、プロンプトの最初の「>」が赤くなっているのがわかると思います。
f:id:yomon8:20150429223748p:plain

 
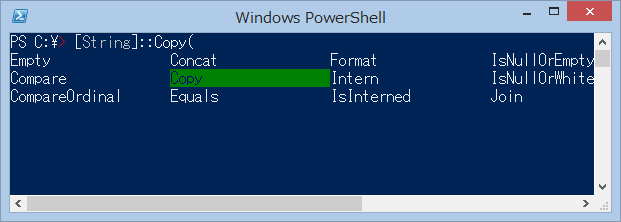
後は、ISE使っている時と同じようにCtrl+[Space]を押すとメソッドの候補の一覧が表示されてカーソルキーで選択できます。こちらはかなり便利。
f:id:yomon8:20150429224046p:plain
 
 
他に良いと思ったのはRedo/Undoです。エディタのようにCtrl+ZとCtrl+Yが使えます。「^Z^Z^Z^Z^Z」なんてなる状態とはおさらばです。


まだ使い始めたばかりなので、何かあれば追記していきます。

2015/07/30追記

Windows 10やWindows Server Technical PreviewにはPSReadLineがデフォルトで入っているようです。